Showing posts with label Cakes N Bakes N Cookies. Show all posts

Tuesday, February 28, 2012

Boiled Fruit Cake/Christmas Fruit Cake Cheaters Style


"Here's a big piece for my favourite lill one", with these words heaven descended on a plate and was handed over into my tiny hands, Principal Uncle was the god handing over a piece of heaven to me, a piece of Christmas Fruit Cake. At that tiny age it was hard for me to think beyond eating that cake but Principal Uncle who was my Grandpa's friend and elder to my Grandpa, used to make this wonderful and heavenly Fruit Cake All By Himself. All I knew about him that he was a Christian by religion and was retired principal of Rosary High School, predominantly a boy's school during his term, hence we all kids called him "Principal Uncle". He was a social fixture at my Grandpa's locality and all kids loved him as he bore a cuddly teddy bear exterior and jolly personality beneath. Grandpa and I had a very special bond, I used to tag along with him every time he stepped out of home, we used to visit all of his friends, which was kind of "all male tea party". He too was a teddy bear kinda fellow with a distinct hearty laughter. They all used to talk about their good old days, shared their heroic stories, crack jokes, ponder over political issues & local problems etc while we kids sat munching our Fruit Cakes & Sandwiches. This was almost 24-25 years ago, time passed and people disappeared, I never knew how or when Principal Uncle passed away or what was his real name, now I can't even inquire about it as my Grandpa too passed away in 2006. But since last few days I kept remembering Grandpa and Principal Uncle which made me crave for that Decadent Fruit Cake, so I decided to try my luck making it by myself.

Searching on web I came to a conclusion that authentic Christmas Fruit Cake was a laborious task involving pre-planning, making candied fruit peels and worst of all it involves brushing it with brandy or rum while it ages, now thats the problem, this country being a non-alcoholic I can't find brandy or rum out here and waiting while the cake ages, COME ON, WHO DO YOU THINK P IS?!! His least accessible virtue is patience, especially when it comes to sweet edibles. So I opted a cheat version of Christmas Fruit Cake, Boiled Fruit Cake, adopted from the site www.joyofbaking.com
 
Behold............. the pearly heaven doors have opened and there's a sale, yup, a BOILED FRUIT CAKE SALE. LOL. Kidding aside I just completed my first fruit cake and my home smells like heaven. Right now the cake is duely photographed and done with the taste test, all I can say is its just AAAAWWWESOME and tastes very much like Principal Uncle's Fruit Cake, although not exactly but I can do away with the minor taste differences.
So here's to you Principal Uncle and to you Dada (Grandpa). Christmas has come much much earlier this year for me. :)


Ingredients:

1 cup warm water
1 cup light brown sugar or 1 cup refined sugar + 1 tbs molasses
1/4th cup unsalted butter 
1/2 tsp salt (if using salted butter add just 1/4 tsp of salt)
1/2 tsp cloves powder
1 tsp cinnamon powder
1 1/2 tsp ground ginger/ ginger paste
2 cups seedless raisins 

Bring all the above ingredients to a boil and keep boiling them for 5 minutes on a medium to low heat. Turn off the heat and let the mixture cool down to lukewarm.

While the mixture is cooling down, take a large bowl and seive in
1 1/2 cups all purpose flour/maida
1 tsp baking soda

Mix 1 cup of chopped candied orange peel and 1 tsp vanilla powder/extract to the flour mixture. 

Lightly beat 2 large eggs or 3 small eggs in a bowl and keep aside.

Preheat the oven at 180 degree C. Lightly dust a bundt cake mould or a rectangular 9" x 5" mould and keep aside.

Once the mixture is lukewarm add it to the bowl of flour mixture along with the lightly beaten eggs. Mix them properly and transfer it into the baking mould/tray.
Bake the cake at 175-180 degree C for 45 to 60 minutes or untill the toothpick inserted comes out clean.
Once done let the cake cool in the mould for 10 mins, run a knife along the edge of the mould. Remove the cake carefully and place it on a wire rack to cool it down evenly.


After it has cooled thoroughly store this cake in an airtight plastic container.
This cake ages very well, the flavours enhances after a day or two, hence this cake can be prepared in advance and stored for any occasion later on.
This cake can even be frozen and stored for longer terms.
I had prepared candied orange peels a day before, I shall be posting the recipe soon.
You can use candied fruit peels of various other fruits of your choice.
You can half the quantity of raisins and add in equal amounts of other dry fruits like chopped almonds, walnuts, cashew etc. Just make sure all the dry fruits should not add up more than 2 cups in total. I used only raisins becoz that was the only thing available on hand for me. I'm planning my next batch of boiled fruit cake with dry fruit mix of walnuts+almond+raisins all equal amounts.

Verdict:
This recipe is a keeper, although this is my first fruit cake, it turned out pretty well, it has lovely moist texture, nice aroma of all those spices and a nice punch of orange peel candies. A sure surprise with every bite.


Tuesday, May 18, 2010

Moist Mocha Chocolate Cake


I prepared this cake last Wednesday but my procrastination delayed its posting. Although the cake is duely devoured by me and P, the main reason for procrastination was that during the process of removing the cake from the base of spring tin, I successfully managed to crack its top crust and my need for baking perfection went into a stress mode. Even while eating the last bits and crumbs of the cake I couldn't help thinking how nice it would've been if it had been PERFECT bake and how perfect it would have tasted than (as if the crack in the top crust dissolved some of its flavor, eyes rolling and silly me ). I know I know sometimes I find myself being a bit "Monica'ish" but then can't help it either. At one point I ruled out this one as not being "blog-worthy" too... sigh.
But now as the Monica personality is wearing down and the taste lingers of that "near perfect" mocha chocolate cake, the crack kinda disappears in my mind and all I remember is the perfect flavor, delicate texture and right crumb of the cake. So here is the recipe of my nearly perfect and not so blog-worthy Coffee/Tea Time Cake. :)

                             "Perfect" at this stage.
Seive together in a large bowl
1 cup pastry flour
1/4 cup unsweetened cocoa
1 cup sugar
1/2 tsp baking powder
1 tsp baking soda
1/2 tsp vanilla extract (I used powdered extract so add in dry ingredients, I you are using liquid extract add it along with wet ingredients)
1/2 tsp salt

Prepare Coffee: Add in
1/2 cup hot water
3 tsp instant coffee granules (I used Maxwell instant coffee, add in any brand you prefer)

Using a hand blender mix
1/2 cup Hot coffee (Prepared in previous step)
1/2 cup milk
1/2 cup vegetable oil or canola oil
1 egg
blend for 2 minutes.

Preheat oven at 175 Degree C. Grease and dust 8" or 9" cake Pan, anything smaller than this and your cake shall over flow.
Add wet ingredients to dry ones and stir gently using a wooden/rubber spatula. Do not over beat, I repeat do not over beat or else you shall end up with mocha chocolate bread.
Gently pour this cake mixture into the greased and dusted pan and place it in the oven.
Bake for 30-40 minutes or till the toothpick inserted in center comes out clean.
                                                 Can you spot the crack... its right there!!!!

                                                       Hope now you can see it!!!

                                                             Ah, the flavor still lingers!!!!

Saturday, May 1, 2010

Khari Biscuits/Surati Khari-100% cheaters recipe

Well, I confess, I cheated, but I have a perfectly valid reason for it, I was yearning for surati khari biscuits so much that I didn't want to wait till my vacation to Gujarat, sole land where I can find khari biscuits, can't expect to find that perfect khari here is Saudi Arabia, sigh :(. So I cheated my way to make khari at home. I know it sounds impossible but I did manage to make it in 15 mins, well literally 25 mins :).
I used Puff Pastry Squares that are readily available at any supermarkets, cut them into 3, brushed it with milk and baked in preheated oven at 200 degrees C for 23 minutes. And done, perfect flaky khari biscuits for that hot afternoon tea. All I need to do now is wait for P to come home then make perfect masala chai and enjoy my Khari with a person who too is head over heals for khari, he can be termed as die hard fan of khari.
Enjoy the snaps of my finished product.
                                                               Just out of the oven!!!

                                            Check out the layers... beauty ain't they?!!

            Thorough inspection to see whether they are well baked to its middle-most layers.

                        Can't stop admiring those lovely flaky layers. Almost drooling at this point... :)

                                                                    Cooling off.

                     I bet these won't even last 2 days. Would you like to have some?!!!

Sunday, April 18, 2010

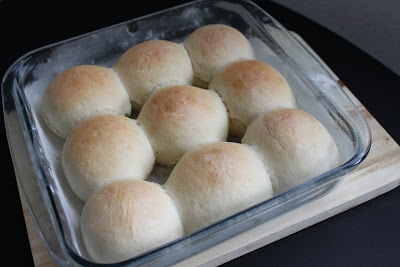
Ladi Pav/Maska Pao/Double Roti/Basic White Dinner Rolls/Butter Rolls


I know you guys might be thinking whats with me and baking, well the reason is, I have a brand new oven on my hand, isn't that good reason enough?!!! As you must have guessed these days I spend days searching and surfing for good baking recipes and what better than baking the most basic baking recipes, so I thought of baking my own buns for pav bhaji, which I have planned for dinner tonight.
Now surfing for pav-bhaji pav was a daunting task in itself, many bloggers had attempted to prepare and bake these goodies, but what I was looking for, was the very very basic ladi pav that we get at pav-bhaji stall in any city in India, some call it maska pav, some double roti and some ladi pav. Ladi pav means a slab bun, it literally is a slab of multiple buns stuck together and is well known for its soft tender interior and crunchy upper crust. It has pillowy goodness which would meet the standards of any delicate royalty, here I can surely say it melts in your mouth without any effort at all. Ok I feel the readers yawning.... so coming back to the quest for the perfect recipe, there are many bloggers who have either over baked it or looking at the snaps of their creation didn't satisfy my standards of perfect pav, either they were too crunchy interior or hadn't puffed enough or where just plain dry to look at, I could feel the hardness of the pav from the pictures itself, but too be very frank some did meet my stringent standards.
After being too critical labeling recipes as hard, flat, dry etc, I was very doubtful about the recipe that I decided to try my baking luck on, but to my delight it came out just perfect and I wouldn't change a thing. Hope you enjoy watching it, as much as I did, baking it.

Ingredients:
2 cups of APF/Maida
1 1/2 tsp sugar
1 tsp active dry yeast
2 tsp butter melted
1 tsp salt
1 cup luke warm water

2-3 tsp of milk for brushing

Preparation Method:
Take 1 cup luke warm water and add yeast and sugar, mix well and let it rest for 5-10 minutes. This is done to activate the dry yeast by feeding it sugar and warm water. After 5 minutes you shall notice that a layer of bubbles have started to form on top of the water, this is the sign that yeast is ready. At this point add salt and mix well.
On a wide working surface take APF and make a well in middle. Pour the water sugar and yeast mix to this well and start kneading a soft dough. At the very start you might feel that you have added excess water as the dough might be very very sticky and hard to handle but rest assure APF will soak up all the water and turn into soft pliable dough in just a few minutes of kneading. Key to it is "Keep Kneading". After a solid 5-8  minutes of kneading the dough will be soft and almost non-sticky, rather glossy and light to feel, now add 2 tsp of melted butter and knead a bit more. Just enough to incorporated the butter in the dough.

Lightly oil a very large bowl and place the dough in it. We are taking very large bowl coz the dough shall rise and double its size in it.
Cover it with cling film or put the bowl in plastic bag and put a knot to it. Place the bowl of dough in a warm place for 1 & 1/2 hours to 2 hours to rest and rise.

                                                  This is dough after rising for 2 hours

Open the dough and punch it down so as to release all the air from the dough, 3-4 knocks are enough. Now divide the dough in 8-10 chunks and roll them into a very smooth balls (I made 9 equal dough balls).
Dust a tray or a pan in which you intend to bake pav. Place the dough balls at 1-2 inches distance, cover it with cling film again and keep aside for 30 minutes.

                                                 9 dough balls placed in a dusted dish
                     
                                 Covered the dish with cling film and set aside for 30 more minutes

Preheat the oven at 190 Degree C for 10 minutes.

You shall notice that dough balls might have risen and shall now be slightly touching each other.


           After 30 minutes of rest time dough balls brushed with lill milk.... now almost touching each other

Brush the top of the pav with milk using a cotton ball or a kitchen towel or a brush (I prefer using silicone brush) and place them in oven. Bake for around 25 minutes or till they are golden brown on the top (my oven took 28 minutes to be precise)


                                                                      Baking in oven


                                             Just out of oven and ready to be glazed with butter


                                          Lightly spread a lill butter with the help of brush

                                                                Close up after glaze


                                           Check out the tenderness and airy pockets of pav

                    This is how soft they are... that one just bounced back as soon as I loosened the pinch


Enjoy along with marmalade or butter or pav bhaji or vada pav or misal pav or usal pav or dabeli or egg curry or egg bhurji... options are endless.

Tips:
Kneading the dough for 5-8 minutes helps to form gluten in the dough. Gluten affects the elasticity and hence the chewiness of the bread, in short directly affects the volume of baked product. In general, bread flours are high in gluten while cake flours are low. We want our breads to be airy and elastic and our cakes to be moist and tender. The amount of moisture in the dough also affects the formation of gluten. Baking schools teach that to make a perfect white bread one has to add 55% of moisture to flour proportion.

Brushing milk on the top of the dough balls ensure that we have a nice crust to the pav. It also ensures a nice sheen to the pav.

Rub a little butter on top of the pav after they have been baked and removed from the oven. This will ensure that the pav remains moist and soft and also add a bit more sheen to the finished product.

Always remember if you are using 1 cup of APF add 1 tsp melted butter at the end and if using 5 cups of APF add 5 tsp melted butter in the end... in short ratio is 1 tsp butter per cup of APF.

Monday, April 12, 2010

Chocolate Chip Cookies


America's best culinary contribution to the world comes in form of small round cookie having mini blast of chocolate in form of chocolate chips, yes I'm talking about chocolate chip cookies. P is crazy about Ben's cookies especially when served warm and soft and chewy. This will be the first time I shall be baking any cookies and as if being overly confident in my baking skills, I've already promised someone that I shall bake some Chocolate chip and Double chocolate chip cookies for them, which now makes me nervous.
I've adapted this recipe from a perfectly tried and tested site www.joyofbaking.com (minor changes to original recipe) and I should say this recipe truely rocks. Also I have halved the recipe from the site as I wanted to make a smaller batch at a time. The site has recipe for 4 dozen cookies while I made almost 2 dozen at one go. Cookies came out perfect and I shall let the pictures advocate themselves.


Sift together and keep aside.
1 cup + 1 tbs plain white flour/maida
3/4th tsp vanilla essence or vanilla extract
(I used powdered form so added to flour mix, if you are using extract or essence add it along with egg to butter mix)
1/4th tsp salt
1/4th tsp baking powder
1/2 tsp baking soda


In a large bowl whisk 1/2 cup unsalted butter untill light and creamy. Add 3/4th cup sugar (can also use brown sugar and white sugar in 1:1 ratio to make 3/4th cup together), keep whisking it for about 3-5 minutes or untill the mix feels fluffy. Add in 1 whole egg at this stage and whisk for few more minutes. Use a hand held mixie for this whole process if in hurry. I prefer to beat this mix with wire whisk only and the process takes no more than 10 mins.

Before proceeding further, preheat oven to 375 degrees F(190 degrees C) with rack in center of oven. Line two baking sheets with aluminum foil/parchment paper, I prefer aluminum foil.

Now add in the sifted flour mix to the butter mix and using your hand mix in to form a soft fluffy dough. It take not much of an effort to do this, folding flour in butter mixture using fingers will suffice. now add in 3/4th cup Hershey's semi sweet chocolate chips.

Divide the dough in 25 chunks and roughly form a semi flat balls and place them on the baking sheets 1 inch apart. Bake for 12-18 minutes or till cookie edges turn golden brown. Keep a contstant eye on cookies after 12 minutes as these delicate goodies can burn very easily and cooking time varies for every oven. Mine took 16 minutes.

Dunk it in milk or just carry a few to enjoy during your drive to office, nothing beats this small treat in itself.

Monday, March 8, 2010

Apple & Raisin Cake


Wishing you all a Very Happy Women's Day. To my loving Mom and Mother-in-Law, this is for celebrating you, as you are, just the way you are, loving, caring and indispensible to me. And to all my girl friends and fellow bloggers , wishing you all are very happy women's day.

I've adopted this recipe from Shilpa's blog here thanks shilpa for posting this easy to bake and tempting recipe. I've baked this cake in my pressure cooker, yeap you're reading it right, in my pressure cooker just to make a contribution to Nupurs MBP # 1 Cookers, Blog Bites
This cake came out to be super moist and rich in texture, raisins gave a nice surprise at every bite, apple flavor was subtle and blended nicely with vanilla flavor. 

Ingredients:

1 cup all purpose flour/maida.
1 apple (i used 1 big gala apple)
1/2 cup raisins
3/4th cup sugar
1 1/2 tsp baking powder
1 tsp vanilla extract/essence
2 medium eggs
1/3 cup + 2 tbs milk
1/3 cup oil (i used sunflower oil) + little more for greasing
1/4th teaspoon salt

 Method:
Grease and dust one baking pan, in my case cooker ka dabba, grease with oil and dust it with maida. Keep it aside.
Place pressure cooker on a very low heat along with its lid closed but Remember to remove its whistle/weight (we shall bake cake without the whistle ). This is done to make an oven environment. Place a small ring or some small stand in the cooker, this is to place our dabba on it.

Remove the skin of apple and chop it into big chunks and place them in a blender along with milk. Blend it well.
Add oil and pulse it couple of times to make sure oil is mixed well.
In a deep bowl, break in the eggs and beat them till light and bubbly. Mix this with apple,milk and oil liquid. Just mix it dont beat it.
Now sift baking powder, salt and all purpose flour and mix in sugar nicely. Make a well in middle and drop in raisins.
Add the milk, apple and egg mix to the flour mix and gently fold it, make sure you dont over stir or beat it well or else it shall result in sweet bread instead of perfect cake, I make sure not to stir more than 10-14 stir rounds.
Pour this into the dusted dabba.
Place it in the cooker and bake it for 40-50 mins.
To check whether the cake is done, insert a toothpick and draw it out, if it comes out clean turn off the heat and remove the dabba. Let it stand for 10 mins and then remove the cake frm the container by inverting it on a plate.
Allow the cake to cool. Store in an airtight container.
This cake can be stored for upto 3 days without refrigeration and upto 15 days in refrigerator.


Tips:
Dust powdered sugar on the cake after the cakes cools down completely.
Decorate this cake with nice vanilla icing and cherries for a nice party dessert.